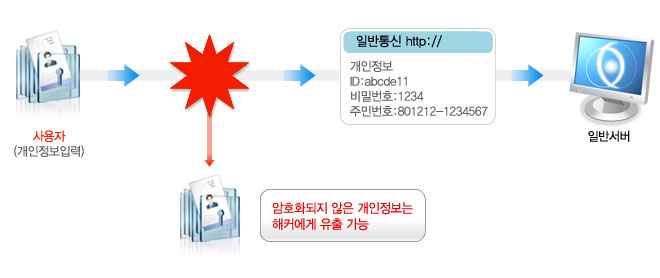
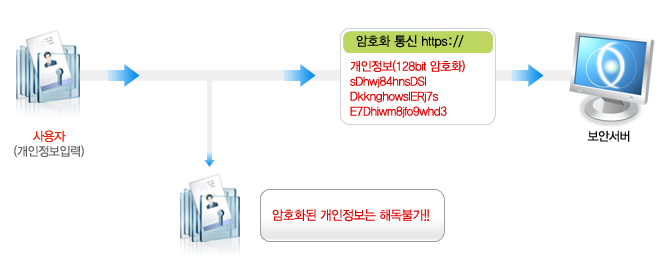
SSL 웹서버 인증서는 웹사이트 이용자의 개인정보를 보호하기 위한 보안장치입니다. 웹사이트에서 회원가입 신청을 할 때 id, 비밀번호, 주민등록번호, 이름, 주소, 핸드폰번호, e-mail 주소 등을 입력합니다. 또 사이트에 로그인을 할 때 id와 비밀번호를 입력해야 로그인을 할 수 있죠. 신용카드로 제품을 구입할 때는 신용카드 번호와 암호, 개인의 배송 정보 입력은 필수적입니다. 이렇게 웹사이트를 이용할 때 개인이 입력한 신상정보가 웹브라우저에서 웹서버로 전송되는 과정에서 암호화 처리가 되어 있지 않으면 가로채기 등의 해킹을 통해 해커에게 쉽게 노출될 수 있습니다. 정부는 법을 제정하여 개인정보가 외부로 유출될 수 있는 위험을 방지하기 위해서 보안서버를 구축하도록 의무화 했습니다. 참고로, SSL은 Secure Sockets Layer의 약자로서 Netscape Communications와 RSA Data Security가 공동으로 개발한 데이터 전송 프로토콜입니다. 웹서버에서 SSL이 사용하는 특정 포트를 사용해서 데이터를 송수신하게 되면 암호화처리를 해 주기 때문에 개인의 신상정보를 안전하게 보호할 수 있습니다.
보안서버의 필요성
정보유출 방지(sniffing 방지)
학교, PC방, 회사 등의 공용 네트워크를 사용하는 PC에서 보안서버가 구축되지 않은 사이트로 접속할 경우, 개인정보가 타인에게 노출될 가능성이 매우 높습니다. 스니핑 툴(sniffing tool)을 사용할 경우 다른 사람의 개인정보(ID/PW/이메일/주민번호/주소/전화번호 등)를 손쉽게 얻을 수 있습니다. 따라서 보안서버는 개인정보보호를 위해서 반드시 필요합니다.
위조사이트 방지(phising 방지)
보안서버가 구축된 사이트를 대상으로 피싱(phishing) 공격을 시도하기는 어렵습니다. 따라서 보안서버가 구축된 사이트는 피싱에 의한 피해를 줄일 수 있을 뿐만 아니라 고객의 신뢰를 얻을 수 있습니다.
웹사이트의 운영기관이나 기업의 신뢰도 향상
고객의 개인정보를 안전하게 관리하는 기업·기관이라는 이미지를 부각시킬 수 있습니다.
보안서버의 종류
보안서버의 종류는 SSL 인증서를 이용한 보안서버와 암호화 응용 프로그램을 이용한 보안서버로 나뉘어집니다. SSL 인증서를 이용한 보안서버는 사용자 컴퓨터에 별도 보안 프로그램 설치가 필요 없으며, 웹서버에 설치된 SSL 인증서를 사용하여 개인정보를 암호화 전송합니다. 보안서버 구축에 소요되는 비용이 상대적으로 저렴하지만 주기적으로 인증서 갱신을 위한 비용이 소요됩니다. 암호화 응용 프로그램을 이용한 보안서버는 웹서버에 접속하면 사용자 컴퓨터에 자동으로 보안 프로그램이 설치되고 이를 통해 개인 정보를 암호화 하여 전송합니다.
※보안서버를 식별하는 방법은 아래와 같습니다.
SSL(Secure Socket Layer) 방식의 보안서버
로그인 페이지 등 보안이 필요한 웹페이지에 접속한 상태에서 브라우저 하단 상태 표시줄이나 상단의 주소 표시줄 우측에 자물쇠 모양의 마크 확인
※ 웹사이트의 구성 방법에 따라 자물쇠 모양의 마크가 보이지 않을 수 있습니다.
이 경우 별도의 확인방법은 문의 하시기 바랍니다.
응용 프로그램 방식의 보안서버
일반적으로 국민은행, 우리은행 같은 대형 금융기관 홈페이지에 접속시 설치되는 보안 프로그램이 여기에 해당됩니다. 홈페이지 접속 시 초기화면이나 로그인 후 윈도우 화면 오른쪽 하단 작업표시줄 알림영역에 다음과 같은 암호화 프로그램 실행여부 확인
※ 응용프로그램에 따라 모양은 다르게 나타날 수 있습니다.
보안서버 구축 관련 법 규정안내
보안서버 구축은 현행법상 개인정보를 취급하시는 영리 목적의 사업자 분들은 필수적으로 구축하셔야 하는 의무조항입니다. 정보통신망 이용촉진 및 정보보호 등에 관한 법률에 의해 보안서버가 구축되지 않은 사이트에 대해서는 1천만원 이하의 과태료 등 행정조치가 있을 수 있습니다.
정보통신망 이용촉진 및 정보보호 등에 관한 법률
- 제28조 (개인정보의 보호조치) 정보통신서비스제공자등은 이용자의 개인정보를 취급함에 있어서 개인정보가 분실·
도난·누출·변조 또는 훼손되지 아니하도록 정보통신부령이 정하는 바에 따라 안전성 확보에 필요한 기술적·관리적 조치
를 하여야 한다.
<개정 2004.1.29>
- 제55조 (자료제출 등) ④정보통신부장관은 이 법에 위반한 정보통신서비스제공자등에 대하여 필요한 시정조치를 명할
수 있다.
<개정 2005.12.30>
- 제67조 (과태료) ②다음 각 호의 어느 하나에 해당하는 자는 1천만원 이하의 과태료에 처한다.
<개정 2005.12.30>
8의2. 제28조의 규정을 위반하여 기술적·관리적 조치를 하지 아니한 자
정보통신망 이용촉진 및 정보보호 등에 관한 법률 시행규범
- 제3조의2 (개인정보의 보호조치)
① 법 제28조의 규정에 의한 개인정보의 안전성 확보에 필요한 기술적·관리적 조치는 다음 각호와 같다.
1. 개인정보의 안전한 취급을 위한 내부관리계획의 수립 및 시행
2. 개인정보에 대한 불법적인 접근을 차단하기 위한 침입차단시스템 등 접근통제장치의 설치·운영
3. 접속기록의 위조·변조 방지를 위한 조치
4. 개인정보를 안전하게 저장·전송할 수 있는 암호화 기술 등을 이용한 보안조치
5. 백신소프트웨어의 설치·운영 등 컴퓨터바이러스 방지 조치
6. 그 밖에 개인정보의 안전성 확보를 위하여 필요한 보호조치
② 정보통신부장관은 제1항 각호의 규정에 의한 보호조치의 구체적인 기준을 정하여 고시하여야 한다.
[본조신설 2004.7.30]
개인정보의 기술적·관리적 보호조치 기준
- 제5조 (개인정보의 암호화)
②정보통신서비스제공자등은 정보통신망을 통해 이용자의 개인정보 및 인증정보를 송수신할 때에는 보안서버 구축 등의 조치를 통해 이를 암호화해야 한다. 보안서버는 다음 각 호의 어느 하나의 기능을 갖추어야 한다.
1. 웹서버에 SSL(Secure Socket Layer) 인증서를 설치하여 개인정보를 암호화하여 송수신하는 기능
2. 웹서버에 암호화 응용프로그램을 설치하여 개인정보를 암호화하여 송수신하는 기능
- Q.
Firefox error code: sec_error_unknown_issuer
- A.
설치 후에 IE 브라우저에서는 문제 없으나 Firefox 에서 위의 에러를 보시는 경우가 있습니다.
이 경우는 서버에 체인인증서가 설치되지 않았기 때문에 나오는 에러입니다.
해당 업체에서 받으신 체인인증서 파일을 설치 후 데몬을 재시작하시면 이상없이 해결될것 입니다.
- Q.
SSL 적용 후 이미지 깨짐 현상 해결 방안
- A.
많은 분들이 SSL 적용 후에 해당 페이지에서 보안확인창이 뜨고 아니오를 클릭하면 이미지가 깨지는 문제를 겪고 계십니다.
이 문제는 https 페이지에서 해당 사이트가 아닌 다른 곳에서 이미지를 불러오거나 하는 경우에 발생하는 에러 메시지 입니다.
예를들어, https://www.badaweb.co.kr 페이지 안에서 www.badaweb.co.kr 도메인 밖에 있는 이미지를 불러오거나 img tag 에서 http 로 사용할 경우 문제가 발생할 수 있습니다.
이를 해결할 수 있는 방법은 <img src=https://www.badaweb.co.kr/images/name.jpg> 이런식으로 https 페이지에서만 절대경로를 써주시거나
<img src=/images/name.jpg> 식의 경로로 소스를 수정해주시면 됩니다.
- Q.
RSA server certificate CommonName (CN) `www.mydomain.com�…
- A.
아파치를 업그레이드를 하거나 인증서 갱신 후에 아래와 같은 에러로 데몬이 올라오지 않는 경우가 있습니다. 이럴 경우 대처할 수 있는 방법을 알려 드리겠습니다.
[warn] RSA server certificate CommonName (CN) `www.mydomain.com' does NOT match server name!?
1. /etc/hosts 파일에 해당 도메인의 아이피와 도메인이 셋팅 되어 있는지 확인
예) 123.123.123.123 www.mydomain.com
2. Apache Config 수정 (httpd-ssl.conf or ssl.conf)
ServerName www.mydomain.com:443
DocumentRoot /home/directory/public_html
SSLEnable
SSLCertificateFile /etc/httpd/conf/SSL/mydomain.crt
SSLCertificateKeyFile /etc/httpd/conf/SSL/ssl.key
SSLCertificateChainFile /etc/httpd/conf/SSL/chain.crt
VitualHost 를 위와 같이 수정하시고 데몬을 다시 시작하시면 아마 잘 작동 될것입니다.
- Q.
Apache 동시접속자 수 늘리는 방법
- A.
httpd-2.x.x 에서의 SERVER_LIMIT 변경
apache-2.x.x 에서는 HARD_SERVER_LIMIT 을 수정하여 Max_Client 를 수정할 수 있습니다.
apache_tarball_source/src/include/httpd.h
#ifndef HARD_SERVER_LIMIT
#ifdef WIN32
#define HARD_SERVER_LIMIT 1024
#elif defined(NETWARE)
#define HARD_SERVER_LIMIT 2048
#else
#define HARD_SERVER_LIMIT 256 <-- 2048 로 수정
#endif
#endif
httpd-2.x.x 부터는 변경 아래와 같이 수정 후 apache 를 컴파일하시면 됩니다.
httpd-2.2.x 소스를 압축 해제 후
server/mpm/prefork/prefork.c 파일에서
#define DEFAULT_SERVER_LIMIT 256 를 아래와 같이 수정합니다.
#define DEFAULT_SERVER_LIMIT 1024
server/mpm/worker/worker.c 파일에서
#define DEFAULT_SERVER_LIMIT 16 부분을 찾아서 ( 16 * 16 = 256)
#define DEFAULT_THREAD_LIMIT 64 이렇게 수정해 줍니다. ( 16 * 64 = 1024)
- Q.
보안서버(SSL) 구축하기- apache 2.2.4
- A.
아파치 2.x의 경우는 1.3과는 달리 mod_ssl을 별도로 추가해서 설치할 필요가 없다.
apache2.x 버전 자체에 모듈이 포함되어 있기 때문에 apache 설치시에 --enable-ssl 옵션만 추가해서 사용하면 된다.
mysql, gd, imap등의 패키지는 이미 깔려 있는 상태이며, 모든 패키지는 /usr/local/src/ 디렉토리 안에 다운로드 받은 상태로 설치를 시작한다.
1. 소스를 다운 받은 디렉토리로 이동
[root@localhost root]# cd /usr/local/src
2. 압축 풀기
[root@localhost src]# tar xvzf httpd-2.2.4.tar.gz
[root@localhost src]# tar xvzfp php-5.2.3.tar.tar
[root@localhost src]# tar xvzf ZendOptimizer-2.6.2-linux-glibc21-i386.tar.gz
3. apache 설치
- apache를 설치하기전에, source 디렉토리내의 server/mpm/prefork/prefork.c 파일에서 #define DEFAULT_SERVER_LIMIT 부분을 1024로 수정 한다. 디폴트값 256으로 컴파일 하게 되면, 아파치 데몬이 최대 256개 까지 밖에 뜰수 없게 된다, 이런 경우는 서버의 접속량이 많을경우 서버의 자원이 남아도 더 이상의 데몬을 띄우지 못해서 서버가 느려지게 된다.
[root@localhost src]# cd httpd-2.2.4
[root@localhost httpd-2.2.4]# ./configure --prefix=/usr/local/apache2 --enable-so --enable-mods-shared --enable-rewrite --enable-ssl
[root@localhost httpd-2.2.4]# make
[root@localhost httpd-2.2.4]# make install
4. PHP 설치 (DB,imap,gd,apache)
- 아래의 옵션을 모두 적용하여 php를 설치 할 경우는 몇몇 패키지가 설치되어 있지 않아 에러가 발생하게 된다. php-5.2.3버전의 경우는 libxml2, libxml2-devel 패키지의 버전문제로 설치가 되지 않기 때문에 패키지 버전을 업그레이드 한다.(http://rpmfind.net 에서 OS에 맞는 최신 패키지를 찾아서 설치한다)
그리고, freetype, libjpeg, libpng등의 라이브러리와 관련된 에러메지시가 발견되면 freetype-devel, libjpeg-devel, libpng-devel 패키지를 추가로 설치하고 php설치를 진행한다.
[root@localhost httpd-2.2.4]# cd /usr/local/src/php-5.2.3
[root@localhost php-5.2.3]# ./configure --prefix=/usr/local/php --with-mysql=/usr/local/mysql --with-apxs2=/usr/local/apache2/bin/apxs --enable-sysvshm=yes --enable-sysvsem=yes --enable-debug=no --enable-track-vars=yes --enable-url-fopen-wrapper=yes --with-ttf --with-png-dir=/usr --with-zlib-dir --with-jpeg-dir=/usr --with-gdbm=/usr --enable-ftp --with-tiff-dir=/usr --enable-memory-limit --enable-mbstring --with-expat-dir=/usr --enable-sockets --enable-wddx --with-freetype-dir=/usr --enable-bcmath --enable-mbstr-enc-trans --enable-mbregex --enable-exif --with-gd --enable-gd-native-ttf --enable-gd-imgstrttf --enable-calendar --with-openssl=/usr
[root@localhost php-5.2.3]# make
[root@localhost php-5.2.3]# make install
[root@localhost php-5.2.3]# cp php.ini-dist /usr/local/php/lib/php.ini
5. ZendOptimizer 설치
[root@localhost php-5.2.3]# cd /usr/local/src/ZendOptimizer-2.6.2-linux-glibc21-i386
[root@localhost ZendOptimizer-2.6.2-linux-glibc21-i386]# sh install.sh
- install.sh 파일을 실행한 후 apache와 php관련된 정보를 입력한 후 설치를 완료한다.
6. httpd.conf 파일 수정후 apache 리스타트
- httpd.conf 파일에 php가 인식되도록 아래 구문을 추가한다.
#################################################
AddType application/x-httpd-php .php .html .htm
AddType application/x-httpd-php-source .phps
#################################################
- httpd.conf 수정후 apache 데몬은 재실행한다. ssl 서버로 시작하기 위해서 startssl 명령으로 시작.
[root@localhost ZendOptimizer-2.6.2-linux-glibc21-i386]# cd /usr/local/apache2/conf
[root@localhost conf]# /usr/local/apache/bin/apachectl stop
[root@localhost conf]# /usr/local/apache/bin/apachectl startssl
- Q.
보안서버(SSL) 구축하기- apache 1.3 + mod_ssl
- A.
mysql, gd, imap등의 패키지는 이미 깔려 있는 상태이며, 모든 패키지는 /usr/local/src/ 디렉토리 안에 다운로드 받은 상태로 설치를 시작한다.
1. 소스를 다운 받은 디렉토리로 이동
[root@localhost root]# cd /usr/local/src
2. 압축 풀기
[root@localhost src]# tar xvzf apache_1.3.33.tar.gz
[root@localhost src]# tar xvzf mod_ssl-2.8.22-1.3.33.tar.gz
[root@localhost src]# tar xvzf php-4.3.10.tar.gz
[root@localhost src]# tar xvzf ZendOptimizer-2.6.2-linux-glibc21-i386.tar.gz
3. mod_ssl configure
[root@localhost src]# cd mod_ssl-2.8.22-1.3.33
[root@localhost mod_ssl-2.8.22-1.3.33]# ./configure --with-apache=../apache_1.3.33
4. apache 설치
- apache를 설치하기전에, source 디렉토리내의 src/include/httpd.h 파일에서 #define HARD_SERVER_LIMIT 부분을 1024로 수정 한다. 디폴트값 256으로 컴파일 하게 되면, 아파치 데몬이 최대 256개 까지 밖에 뜰수 없게 된다, 이런 경우는 서버의 접속량이 많을경우 서버의 자원이 남아도 더 이상의 데몬을 띄우지 못해서 서버가 느려지게 된다.
[root@localhost mod_ssl-2.8.22-1.3.33]# cd /usr/local/src/apache_1.3.33
[root@localhost apache_1.3.33]# SSL_BASE=/path-to-openssl (ex : SSL_BASE=/usr)
[root@localhost apache_1.3.33]# ./configure --prefix=/usr/local/apache --enable-module=so --enable-shared=max --enable-module=ssl
[root@localhost apache_1.3.33]# make
[root@localhost apache_1.3.33]# make certificate
- make certificate 실행시 여러가지 정보를 물어보게 된다. 회사, 주소, 부서 이메일등 ssl 인증키 발급에 필요한 정보가 입력된 csr 코드를 생성하는데 필요한 정보들이기 때문에 정확한 정보를 입력한다. 마지막에 패스워드 설정 부분은 n 을 두번 입력.(y를 선택할경우 apachectl startssl 실행시 패스워드를 물어본다)
- make certificate 실행시 아무 정보를 입력하지 않고 엔터키만 입력한후 마지막의 패스워드 설정부분만 n 을 선택해서 설치를 진행해도 됨. 이 경우는 apache+mod_ssl+php 의 설치가 완료된 후 openssl 명령으로 csr 코드를 재생성 할 수 있다.
[root@localhost apache_1.3.33]# make install
+--------------------------------------------------------+
| You now have successfully built and installed the |
| Apache 1.3 HTTP server. To verify that Apache actually |
| works correctly you now should first check the |
| (initially created or preserved) configuration files |
| |
| /usr/local/apache/conf/httpd.conf
| |
| and then you should be able to immediately fire up |
| Apache the first time by running: |
| |
| /usr/local/apache/bin/apachectl start
| |
| Or when you want to run it with SSL enabled use: |
| |
| /usr/local/apache/bin/apachectl startssl
| |
| Thanks for using Apache. The Apache Group |
| http://www.apache.org/ |
+--------------------------------------------------------+
- 위와 같이 출력되면 설치 완료. httpd.conf 파일을 수정한 후 apache 데몬 실행. 설치중에 패스워드 설정을 하였다면, 패스워드를 입력하고 데몬을 실행한다. ssl 서버로 시작하기 위해서 startssl 명령으로 시작.
[root@localhost apache_1.3.33]# /usr/local/apache/bin/apachectl startssl
5. PHP 설치 (DB,imap,gd,apache)
[root@localhost apache_1.3.33]# cd /usr/local/src/php-4.3.10
[root@localhost php-4.3.10]# ./configure --prefix=/usr/local/php --with-mysql=/usr/local/mysql --with-apxs=/usr/local/apache/bin/apxs --enable-sysvshm=yes --enable-sysvsem=yes --enable-debug=no --enable-track-vars=yes --enable-url-fopen-wrapper=yes --with-ttf --with-png-dir=/usr --with-zlib-dir --with-jpeg-dir=/usr --with-gdbm=/usr --enable-ftp --with-tiff-dir=/usr --enable-memory-limit --enable-mbstring --with-expat-dir=/usr --enable-sockets --enable-wddx --with-freetype-dir=/usr --enable-bcmath --enable-mbstr-enc-trans --enable-mbregex --enable-exif --with-gd --enable-gd-native-ttf --enable-gd-imgstrttf --enable-calendar --with-openssl=/usr
- php configure시에 에러가 발생하는 경우는 서버에 필요한 패키지가 설치되어 있지 않기 때문이거나 필요한 패키지의 버전이 낮아서 발생하는 경우가 대부분이다. 어떤패키지를 체크하는 부분에서 에러가 발생하는지 확인 한 후 yum install 명령으로 필요한 패키지를 설치 한 후 다시 configure 하거나, 필요하지 않는 패키지일 경우 configure 옵션에서 삭제하고 configure를 다시 실행한다.
[root@localhost php-4.3.10]# make
[root@localhost php-4.3.10]# make install
[root@localhost php-4.3.10]# cp php.ini-dist /usr/local/php/lib/php.ini
6. ZendOptimizer 설치 [root@localhost php-4.3.10]# cd ZendOptimizer-2.6.2-linux-glibc21-i386
[root@localhost ZendOptimizer-2.6.2-linux-glibc21-i386]# ./install.sh
- install.sh 파일을 실행한 후 apache와 php관련된 정보를 입력한 후 설치를 완료한다.
7. httpd.conf 파일 수정후 apache 리스타트
- httpd.conf 파일에 php가 인식되도록 아래 구문을 추가한다.
#################################################
AddType application/x-httpd-php .php .html .htm
AddType application/x-httpd-php-source .phps
#################################################
- httpd.conf 수정후 apache 데몬은 재실행한다. ssl 서버로 시작하기 위해서 startssl 명령으로 시작.
[root@localhost ZendOptimizer-2.6.2-linux-glibc21-i386]# cd /usr/local/apache/conf
[root@localhost conf]# /usr/local/apache/bin/apachectl stop
[root@localhost conf]# /usr/local/apache/bin/apachectl startssl
- Q.
웹서버별 백업 방법
- A.
JMicrosoft IIS Version 4.0
1. Open the Microsoft Management Console: Start > Programs > Windows NT 4.0 Option Pack > Microsoft Internet Information Server > Internet Service Manager
2. Right-click the Web site containing the certificate and select Properties
3. Click the Directory Security tab
4. In the Secure Communications section, click Edit
5. Click Key Manager
6. Select the key to export
7. On the menu bar, select Key > Export Key > Backup File
8. A message warns you about placing sensitive information in a file on your hard drive. Click OK
9. Specify the name of the file that will hold the exported key. Click Save
Microsoft IIS Version 5.0, 6.0 or 7.0
Step 1: Create a Microsoft Management Console (MMC) Snap-in for managing certificates
Create a Microsoft Management Console (MMC) Snap-in for managing certificates, as described in solution SO6127.
Step 2: Export the certificate
1. Open the Certificates (Local Computer) snap-in you added, and select Personal > Certificates
2. The Subject field of the certificate lists the Common Name (CN). (Click Tools > Internet Options > Content to view the Common Name if you are not sure)
3. Right-click on the desired certificate and select All Tasks > Export. The Certificate Export Wizard opens
4. Select Yes, export the private key
5. Click Next
6. In the Export File Format window, ensure the option for Personal Information Exchange - PKCS#12 (.pfx) is selected
7. Select Include all certificates in the certificate path if possible and then click Next. (If you do not select the Include all certificates in the certificate path if possible option, your server may not recognize the issuer of the certificate, which may result in security warnings for your clients.
8. De-select Require Strong Encryption. (This may cause a password prompt every time an application attempts to access the private key or it may cause IIS to fail).
9. Click Next
10. Enter and confirm a password to protect the PFX file and click Next
11. Choose a file name and location for the export file (do not include an extension in your file name; the wizard automatically adds the PFX extension for you)
12. Click Next
13. Read the summary and verify that the information is correct. Pay special attention to where you saved the file. Ensure that the information is correct
14. Click Finish
Apache
1. Locate the private key and certificate files. The following directives in the httpd.conf point to the location of the key and certificate files:
SSLCertificateFile ... /path/to/mycertfile.crt
SSLCACertificateFile … /path/to/intermediate.crt
SSLCertificateKeyFile ... /path/to/mykeyfile.key
NOTE : Depending on the version of Apache, the directive may be SSLCACertificateFile or SSLCertificateChainFile and the configuration file may be httpd.conf or ssl.conf file.
2. Copy the .key file, both .crt files (one is the server certificate and the other is the intermediate CA certificate), and the httpd.conf file onto a diskette or CD.
.key - private key
.crt - server certificate
.crt - intermediate CA certificate
httpd.conf - Web server configuration file
iPlanet Version 4.0 and 6.0
1. Locate the alias directory within the iPlanet directory
2. Locate the files: https < server_name > cert7.db and https
key3.db
3. Copy them.
IBM Websphere Server
1. Type ikeyman on a command line on UNIX or start the Key Management utility in the IBM Websphere Server folder
2. Select Key Database File from the main menu, and then select Open
3. In the Open dialog box, type your key database name or click the key.kdb file if you are using the default. Click OK
4. In the Password Prompt dialog box, type your password, and click OK
5. Select Personal Certificates in the Key Database content frame, and then click the Export/Import button on the label
6. In the Export/Import Key window, select Export Key
7. Select the key database file type
8. Type the file name or browse and select the location and file name, and then click OK
9. In the Password Prompt dialog box, type the password, and then click OK
10. In the Select from Key Label list, select the correct label name and click OK
Tomcat
1. Navigate to the SSL Directory where the SSL Keystore is kept. By default this can be a hidden directory. For example: /root/.keystore
2. Make a copy of the keystore file in this directory. This contains your Private and Public keys
- Q.
IIS에서 SSL Port Binding 제거하는 방법
- A.
1. cd c:inetpubadminscripts
2. 명령 프롬프트에서 다음 명령을 입력하여 기본 웹 사이트의 SSL 바인딩을 확인
Ex) adsutil get w3svc/1/SecureBindings
3. 바인딩 제거
Ex) adsutil set w3svc/1/SecureBindings ""
- Q.
Apache 데몬 시작 할 때 패스워드 설정 혹은 삭제하는 방법
- A.
[패스워드 삭제하기]
$ openssl rsa -in [키 파일 이름].key -out [새로운 키 파일 이름].key
[패스워드 삽입하기]
$ openssl rsa -in [키 파일 이름].key -des -out [새로운 키 파일 이름].key